Sunday 2 December 2012

Marble book cake ( madame gateaux private session December 2nd)

Ingredients:  3 recipes of white cake and 1 recipe of white cake but substitute 25gm of cocoa for the pastry flour

sugar 100gm
butter 50gm
vanilla 5gm
egg 1 large
(Creaming method)

pastry flour  95gm
baking powder 4gm
milk powder 8gm
(Add in and mix)

water 65gm
(Add at last)

Put in 3 9x13" pans, first put in the white cake batter, then scoop the chocolate batter in different spot on the pan.
Use a paring knife or fork, run the chocolate batter around in order to create the marble effect.
Tap the pan

Put into a preheat 350F oven, check the doneness after 20-25minute


It is preferable to use buttercream for icing
 ( will post the buttercream and vanilla cupcake next time)

Wait until cakes are cool, layer them with fillings.

Trim off the edges of the cake layers, shape to a book.

Do a crumb coating.

Then icing the cake


 To finish the edges of the book, you can use some melted chocolate and a cake comb to create a pages effect


For the writing, use a knife to make for the area to write on


Decorate the top accordingly.

The above is the finish cake from a student.

For more pictures of cakes and pastries, please visit www.madamegateauxbaking.ca or www.facebook.com/madamegateaux


Friday 29 June 2012

Basic Cream Cake

Ingredients:

For cake: 5 large eggs (room temperature)
                120g sugar
                120g cake flour
                 15g vegetable oil

Whip egg white with 1/2 sugar to soft peak
Whip yolk to pale with sugar and add in sifted cake flour,then oil
Fold in the whipped egg white

Grease 2 7" round cake pan, bake in pre-heated 350F oven
Should take no more than 30 minutes

Take the cake out and cool before assembling

Once cake is cool,you can peel off the top of the cake.  (this will make your life easier when you apply the cream on the cake

Now you can slice the cake to 2-3 layers as desired. Save the one slice that is flat which is for the top of the cake.

For assembling:

1/2 ltr 35% cream
3-4 tbsp sugar (add according to your taste)

Whip the cream and sugar until it is stiff. (Don't over whip and create sweet butter)
simple syrup ( 1:1 sugar:water, boiled and cool.  It is for moist the cake)
sliced fruit, berries ( filling that you like)
Cake board

Assembling:

Put the first slice of cake on the cake board, you can put a bit of the cream on the board to stick the cake slice on it
Use a brush to damp the cake before you apply the cream on the cake slice
Use a spatula to smooth the cream out
Put some of the filling and smooth it out
Put a bit of cream on top before you put the second layer of cake ( it will prevent the cake from slide down)
Once you put the last layer, use a pan and press slightly, so you will not have a dome shaped cake
Stand away and check if the whole cake is levelled.

Now masking your cake
(Some ppl like to do a crumb coating before masking)
Start by apply the cream on the top of the cake, use a spatula and smooth it until it is flat.
You can have a clean damp cloth or a pot of hot water on the side, it will prevent the cream from sticking on the spatula

Once the top is done, start on the side.
Once all sides are smoothed, you can use a cake comb to give a bit of texture

Now is all about decorating with your wild imaginations!


Sunday 13 May 2012

The Art of Sugar Paste Decoration


Sugar paste, also known as gum paste is used to make fancy cake decorations such as flowers, leaves and figurines. 


Helena Borody, sugar paste artist at Madame Gateaux Baking
 
It’s an art that Helena Borody loves and teaches at Madame Gateaux Baking. An artist and sculptor, Helena is drawn to the aesthetics of cake decorations and has been designing many intricate and impressive sugar paste decorations for wedding and special occasion cakes.

Sugar paste rose petal
If you’ve always wondered how to make those pretty designs, or would like to take your sugar paste decorating skills to the next level, Helena will take you through step-by-step to create beautiful decorations that are guaranteed to impress family and friends!

Ready-made sugar paste flowers are available at Madame Gateaux Baking.
Veiners and Cutters available at Madame Gateaux Baking.
Gum paste tools and accessories.
  
For more information on sugar paste decorating class, please contact Madame Gateaux Baking:

Tel: 647-352-0763      

2034 Danforth Avenue, Toronto, ON
(west of Woodbine on Danforth, 3 mins walk from Woodbine subway station)

Store Hours:
Monday - Close
Tuesday - Saturday    10:30am - 7 pm
Sunday                          12pm - 5pm


Tuesday 8 May 2012

Macaron

Mother's Day is just round the corner. We've got a sweet treat to make the occasion a little extra special for Mom - dainty and delectable macaron!
Makes these at home or book a class at Madame Gateaux where owner and pastry chef Noel will reveal insider's tips on making the perfect macaron.


Macaron Part 1
Filling - Green Tea Chocolate Ganache

Ingredients

3g             Green Tea Powder                               
85g          35% Cream (cold)                             
15g          Glucose/Clear corn syrup            
180g       White Chocolate                                  
40g          Butter (room temperature)            

Method

In a saucepan, mix the green tea powder, glucose/corn syrup and cream until it dissolves. Heat it until it’s almost boiled, and remove from heat
Tip: Sift your mixture if you still have any lumpy bits.

Pour the mixture into the white chocolate and stir until chocolate is melted. 

Add the butter when your mixture is lukewarm. 

Store in the refrigerator until needed.  

 
Macaron Part 2

Makes 2 full trays.  Preheat oven to 290F.

Step 1
150g       Diced Blanched Almond
150g       Icing Sugar
55g          Egg White
Pinch     Green Colouring Powder

Grate the ingredients finely in a food processor. Add in a small amount of green colouring powder at the same time.

Step 2
150g       Sugar
50g          Water

Dissolve the sugar in the water, and boil (without stirring) to soft ball stage about 245F.

Step 3
55g          Egg white

Whip the egg white until foamy, pour in the sugar syrup and continue whipping till you get stiff glossy peaks.  
 
Fold the meringue into the almond paste until glossy. 
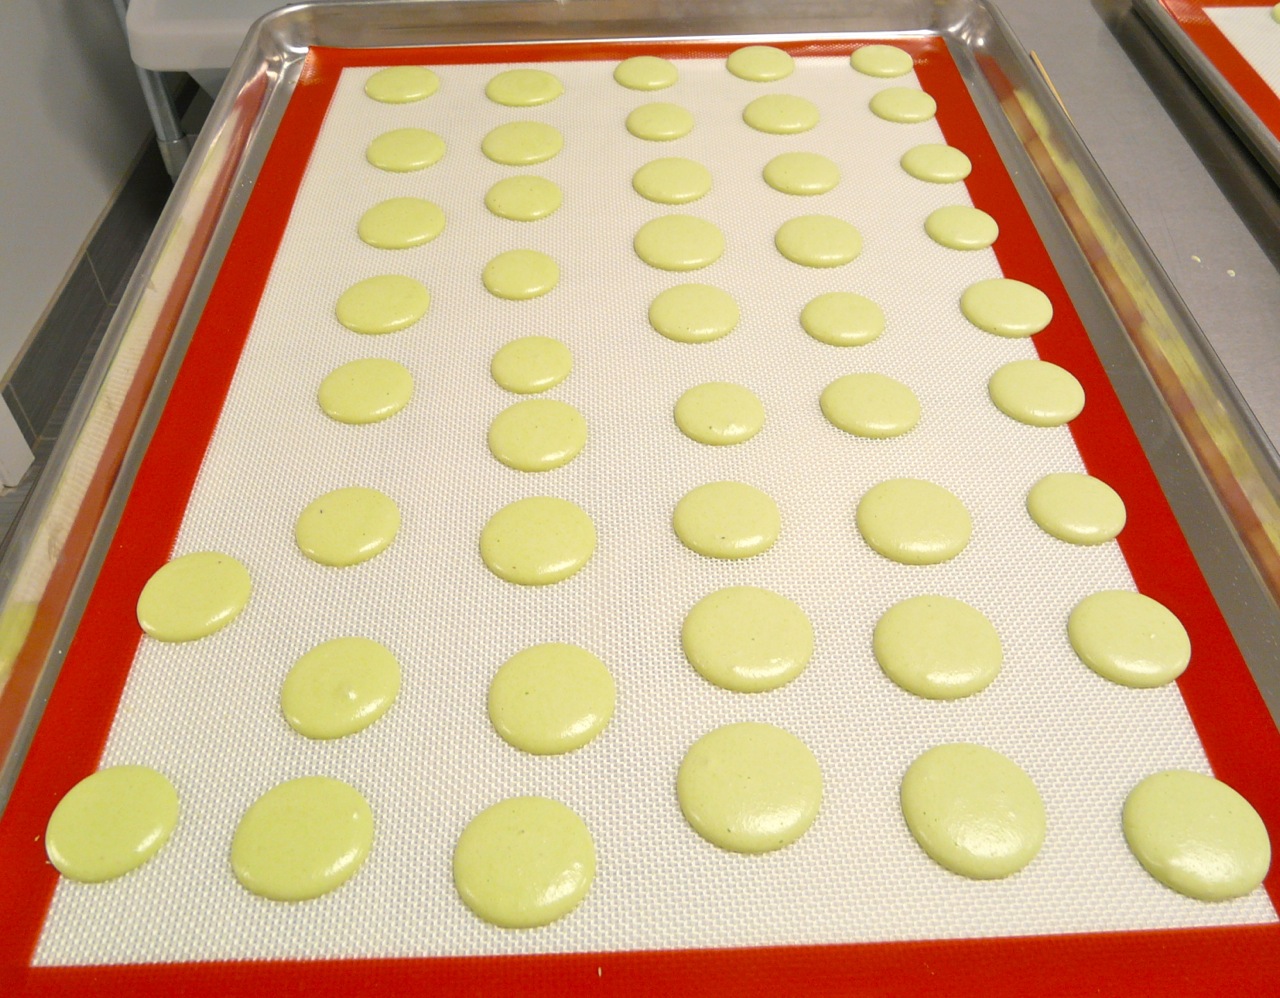
Pipe it onto a silpat-lined baking tray, the size of a quarter.  After piping, let it rest for 45min at room temperature  before baking at 290F oven for about 14-15 mins.


 A silpat-lined baking tray
 
Silpat vs Parchment paper

A Silpat is a non-stick baking pan liner and is highly recommended over parchment paper when it comes to baking macaron . Macaron contains a significant amount of egg whites which has high water content.  The parchment paper tends to absorb moisture and may “wrinkle” your macaron.  Silpat on the other hand does not absorb moisture and lets the Macaron dry out naturally.  

Silpat is made of silicone and fiberglass.  It’s reusable up till about 3000 times, easy to clean and doubles as a non-stick surface for rolling out sticky doughs and candies. Baked goods will easily slide off the non-stick surface without the need for a spatula.

To clean, simply remove any residue with a damp sponge or hand wash it gently with soap and water. Avoid cutting baked goods on the mat to keep the surface free of scratches.  When storing, keep it flat or rolled.  


Left to Right: Baking mat, Silplat, Parchment paper
 Available at Madame Gateaux.


Tuesday 1 May 2012

Cinnamon Bun Class in Madame Gateaux

-->
Cinnamon Buns

Cinnamon Buns is a satisfying treat that’s hard to resist! They’re soft, sweet and smell so delicious in your kitchen. We have a Cinnamon Buns baking class taught by Tom Bayford, an expert pastry chef who’s executed desserts for Britain’s Royal Family and Hollywood celebrities.  This recipe is courtesy of Tom. 


Cinnamon Buns class at Madame Gateaux.


-->
Recipe yields: 12 Cinnamon Buns

Ingredients: Dough

300ml      Warm water                        
19g           Yeast (instant Dry)          
450g         All-purpose flour                
50g           Butter
45g           Sugar                                            
8g             Salt                                                  
2               Eggs, large                             

Ingredients: Filling
1 part Sugar to 1 part Cinnamon Powder
Raisins (optional)

 
-->
Method 

In a mixer bowl, add the instant dry yeast and warm water and stir until the yeast is dissolved.
Add in flour, sugar, salt, eggs and butter into the bowl. 

Attach a dough hook to your mixer. Switch on your mixer at the low speed and gradually increase to medium speed until you get a soft dough. The dough should be kneaded until it's soft and almost "cleans up" the mixing bowl. See below  
-->


-->
Remove the dough, roll it into a ball and let it rest in a lightly greased bowl, covered, until the dough almost doubles in size, about 20-30 minutes.


-->
Knead your dough a bit. To test if your dough is ready for rolling, tear a small piece off and stretch the dough in 4 corners. It should be slightly translucent when you stretch it.  This is known as the “window test”.


  -->
Roll your doug out into a rectangle or square about ½ cm  thick and sprinkle your filling. Then roll your dough into a log and cut it into 12 pieces.  Place the buns on two parchment-lined 13”x18”  baking tray. 

 
-->
Cover your cinnamon buns (with a slightly damp cloth or cling wrap) to proof and let it rest in a warm spot about 45 minutes. Alternatively, place your trays in a oven (not turned on), with a bowl of hot water underneath. See below.


-->
Apply an egg wash and bake it in a 350F oven for 20-25 minutes.

Fresh-baked Cinnamon Buns!

For more information about our cinnamon buns class, please contact Madame Gateaux at Tel: 647-352-0763. We are located at 2034 Danforth Ave, just 3 mins walk from Woodbine Subway Station.
-->